Create a Manual Order in Backend
Order on Behalf・Back-end Order・WhatsApp・Facebook・Instagram・Group Orders
To satisfy the operational needs of different merchants, eshopland ecommerce platform is equipped with creating manual orders feature (also commonly known as “create orders in admin”). This feature allows merchants to manually create customer orders received from retail stores, social platforms and other channels through the eshop admin backend.
When a manual is created, merchant can send the order link to customer through WhatsApp, Facebook Messenger, Instagram (IG) or other platforms for payment process.
Creating manual orders feature is fully integrated with our ecommerce system and supports the following synchronizations:
- All payment methods (including online and office)
- All shipping methods (including auto waybill generation and printing)
- Configured eshop Discounts
- Membership Points
- Membership e-Coupons
Creating manual orders feature is only available for “Professional” plan users, please refer to our Pricing for more details.
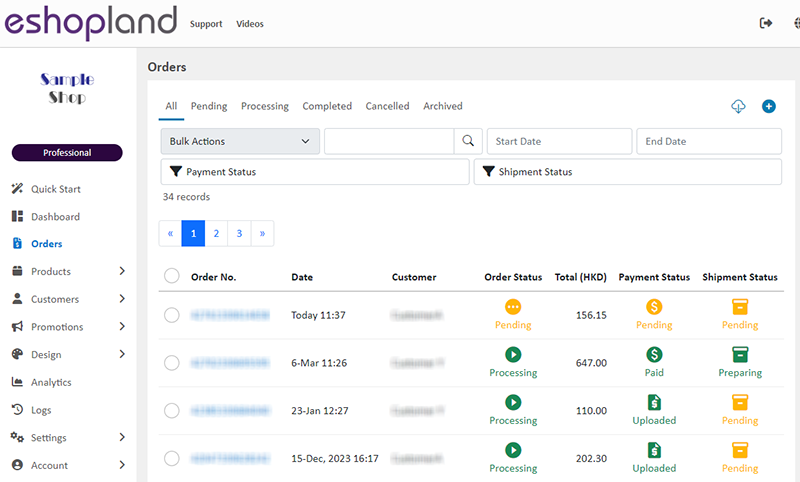
1. Create a Manual Order
Go to Admin Panel > Orders,
Press  Add an Order.
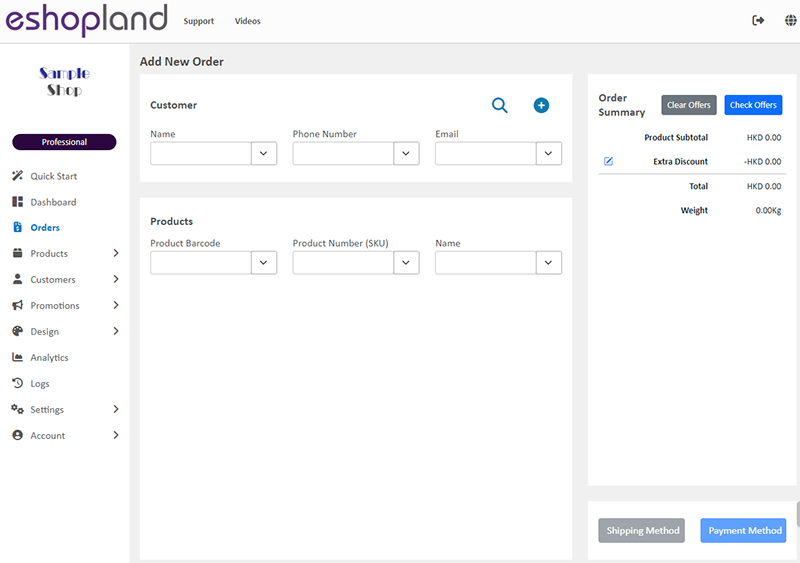
Add New Order Page
2. Select or Add a Customer
Select a Customer
Enter or choose the customer’s Name, Phone Number or Email from the eshop existing customer records.
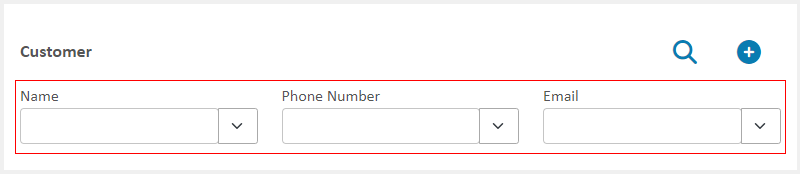
The customer’s basic contact information, membership status and available membership points (if any) will be displayed instantly.
Merchants can Edit  existing customer records.
The system will update the relevant customer records in real-time.

Add a Customer
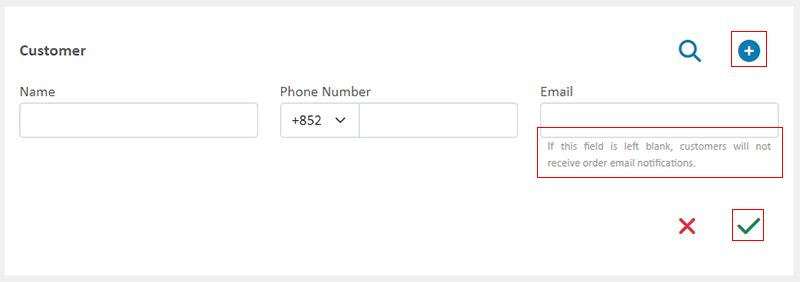
Press Add a Customer,
Then enter the Customer Information to create a new customer record.
Customer Information:
Name (Mandatory)
Phone Number (Mandatory)
Email (Optional)
If merchant has not input a customer’s email, the customer will not receive order notifications sent by the system.
The merchant can copy the order link and send it to the customer through other means such as WhatsApp, Messenger, IG Direct, etc.
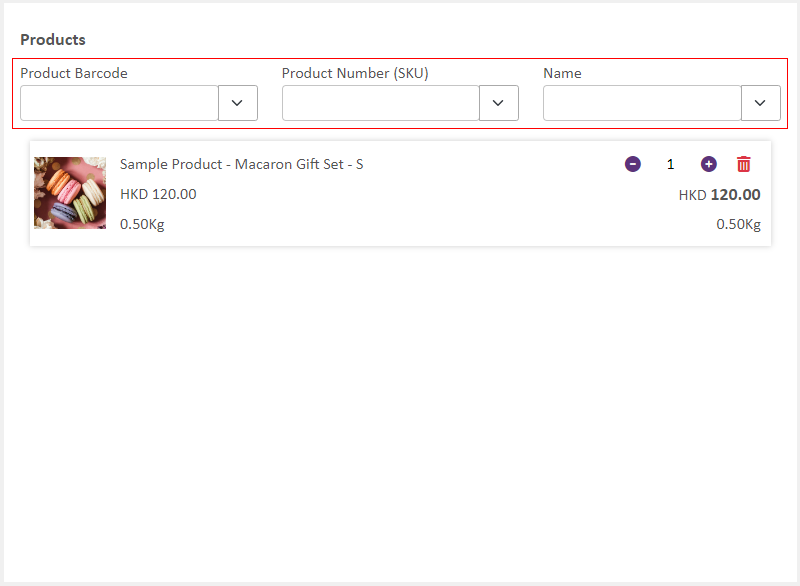
3. Adding Products
Enter or select Product Barcode, Product Number (SKU) or Name to add products onto the new order.
If the product has multiple variants, merchant is required to select a product variant from the “Name” column.
When merchants manually create orders, you can add the following onto the orders:
- “Published” products already available in the online shop;
- “Hidden” products.
However, when manually creating orders, it is not possible to add “Unpublished” products will not be able to add onto the order.
4. Order Summary
When you add products onto the order, the Product Subtotal will be updated in real-time.

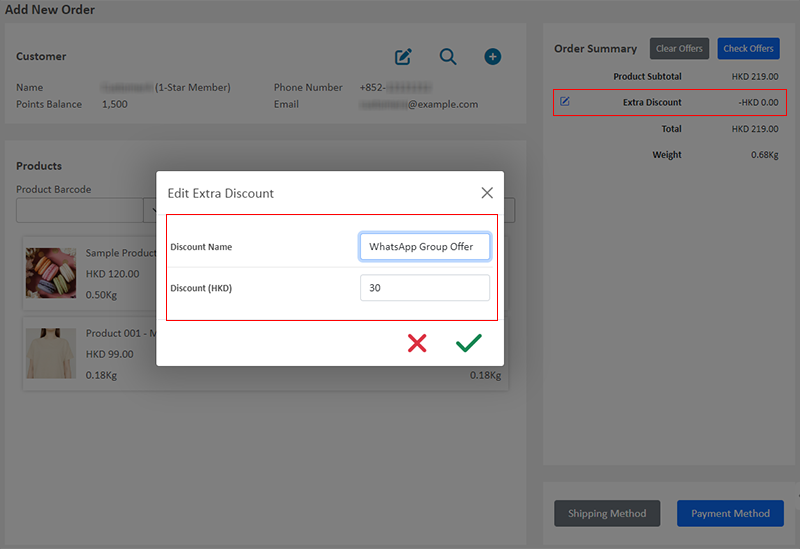
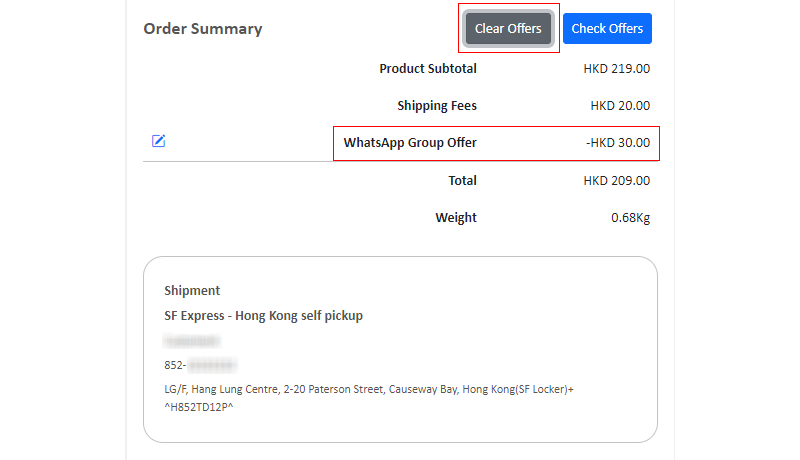
5. Adding Extra Discount
Merchant can manually add an Extra Discount to the order, e.g. Facebook live streaming offers, WhatsApp group offers, Instagram (IG) order discounts, etc.
Press Edit  Extra Discount,
Merchant can customize the Extra Discount Name.
Enter the Discount Amount,
Then Confirm  .
.
6. Select a Shipping Method
Click “Shipping Method” and select a Shipping Method for the order.
All the shipping methods added in the online shop can be selected when creating orders manually.
Shipping Method Settings: Admin Panel > Settings > Shipping
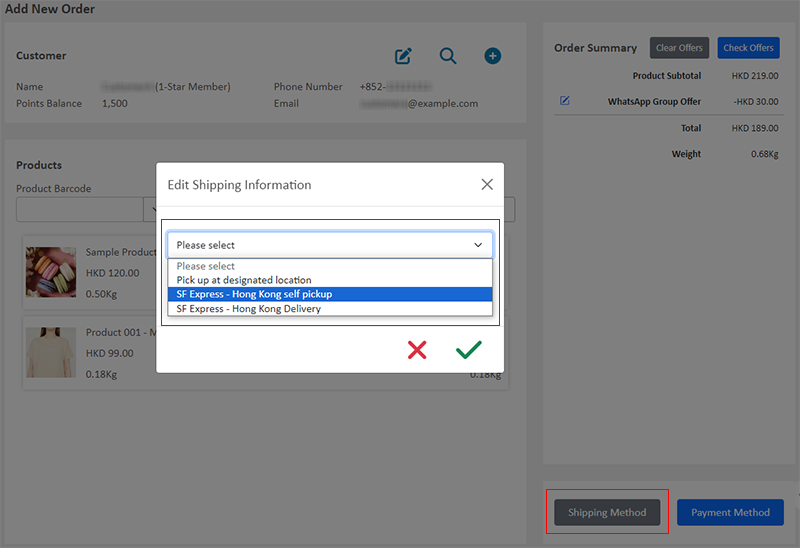
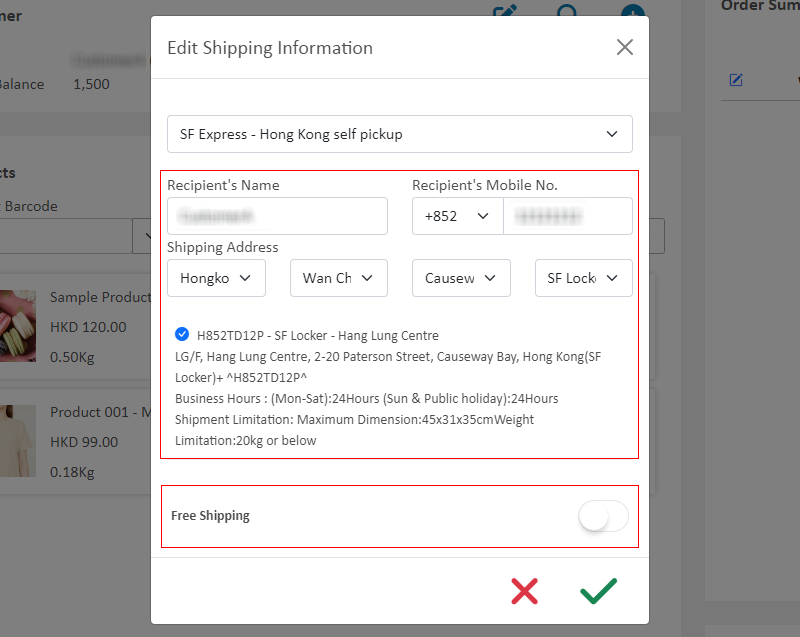
Enter the shipping information.
Merchant can Enable  the Free Shipping button to set this order to Free Shipping.
7. Apply Offers
Press “Check Offers”,
The system will automatically apply applicable discount offers to this order.
The auto applied “Offers” will synchronize with the online shop settings.
Offers Settings: Admin Panel > Promotions > Offers
Membership Offers: Admin Panel > Customers > Membership
Merchant can choose to Remove  an individual Offer applied to order.
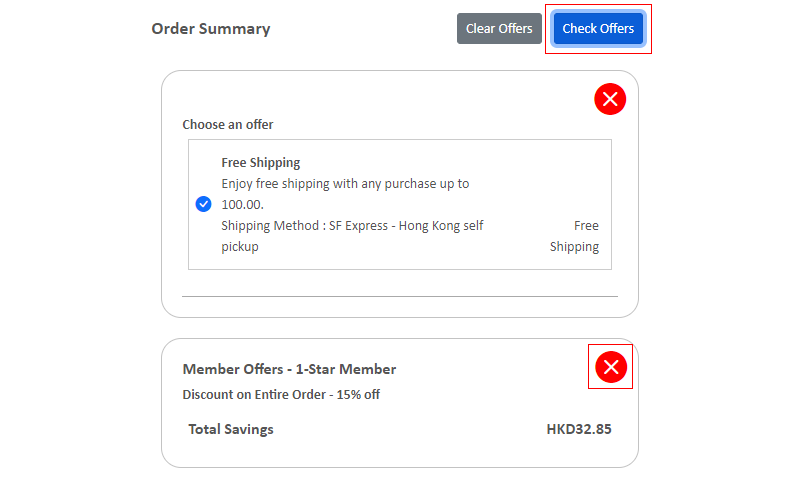
Press “Clear Offers” to clear all applied offers.
“Clear Offers” will not remove the “Extra Discount” added by the merchant manually.
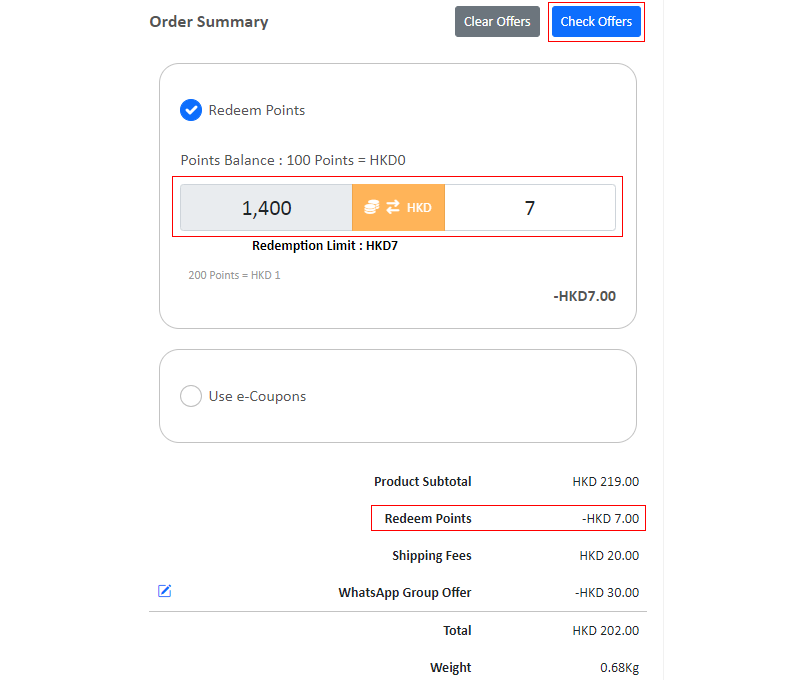
8. Using Membership Points
Press “Check Offers”, if the member customer has available membership points in the account, the points redemption feature will be displayed automatically.
When merchant create manual orders for member customers, you can use the membership points from the customer’s account to offset the product amount.
Membership points cannot be used to deduct shipping fees.
Membership Points is a feature from the Tiered Membership which is only available for the “Professional” plan users, please refer to our Pricing for more details.
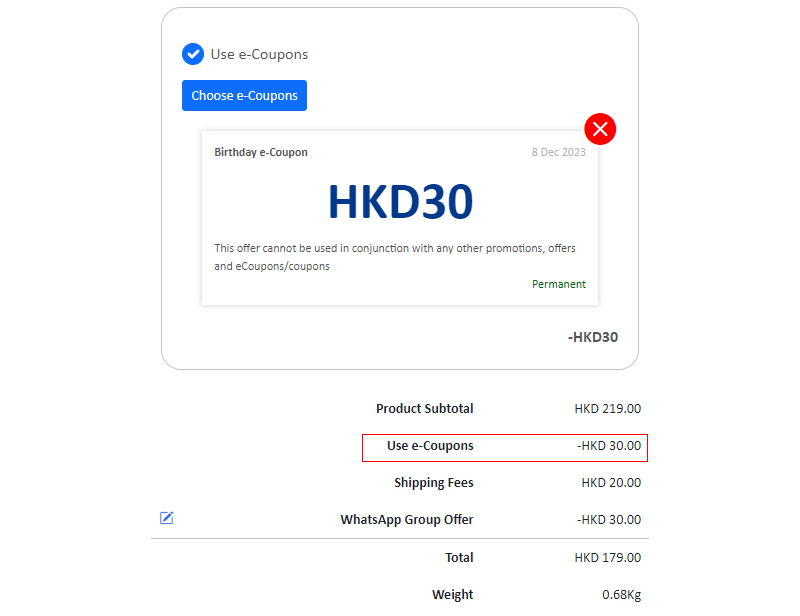
9. Using e-Coupons
Press “Check Offers”, if the member customer has available e-Coupons in the account, the e-Coupons feature will be displayed automatically.
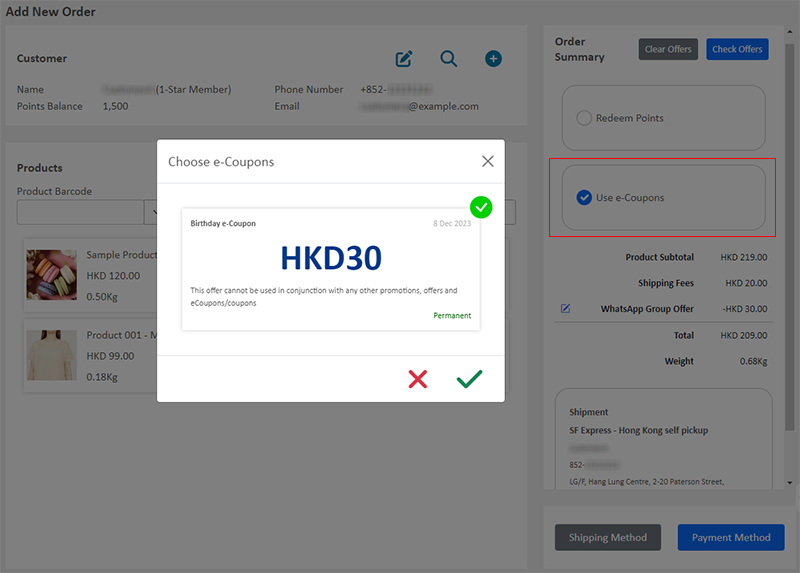
When merchant create manual orders for member customers, you can use the e-Coupons from the customer’s account to offset the product amount.
Membership e-Coupons cannot be used to deduct shipping fees.
Membership e-Coupons is a feature from the Tiered Membership which is only available for the “Professional” plan users, please refer to our Pricing for more details.
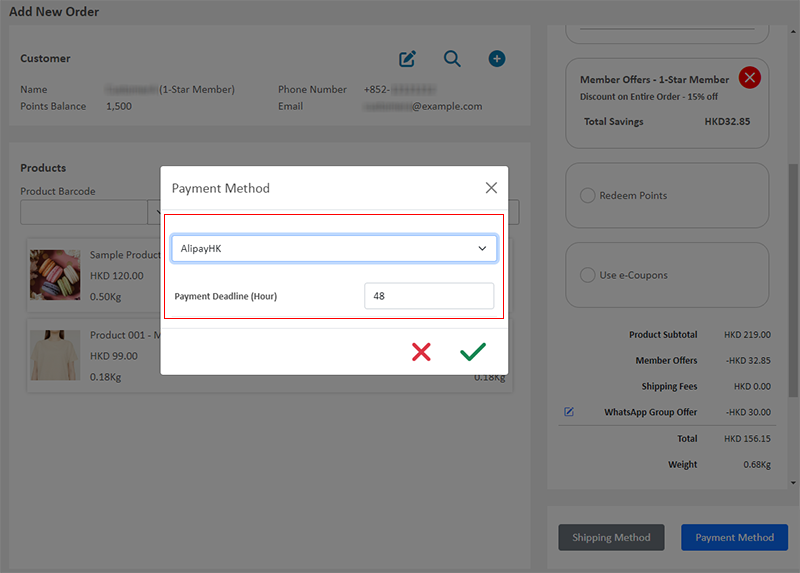
10. Payment Method
Press “Payment Method”, and select a Payment Method for the order.
All the payment methods (including online and offline) added in the online shop can be selected when creating orders manually.
Payment Method Settings: Admin Panel > Settings > Payment
Merchant can set Payment Deadline for the order (counted in hour).
If the customer fails to complete the payment before the payment deadline, the payment status of the order will automatically be changed to “Expired”.
If you have Enabled the “Auto cancel “payment expired” order” feature, the order will be auto cancelled if the customer fails to make the payment by the payment deadline. After the order is cancelled, the system will auto restore the product inventory.
Order Settings: Admin Panel > Settings > Orders
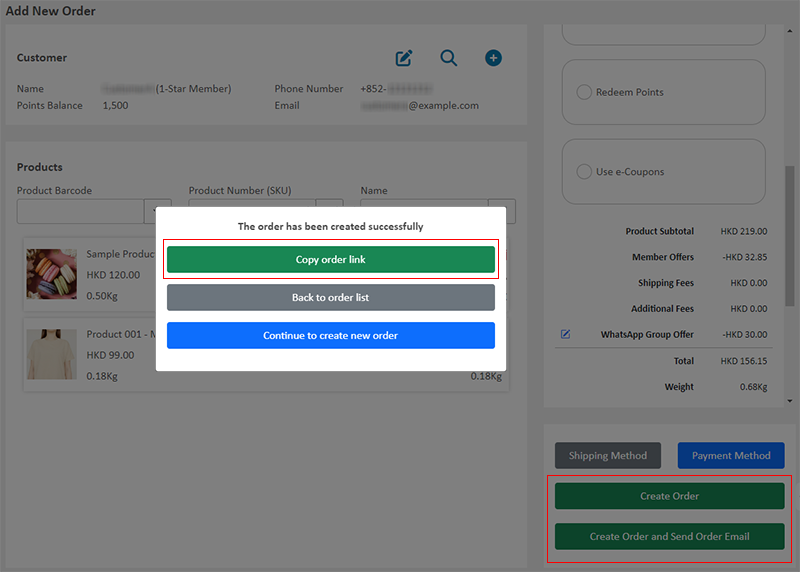
11. Create Order
Click “Create Order”, the order will be automatically created in real-time.
Merchant can copy the order link and send it to the customer.
For security reasons, customer must enter one’s phone number recorded in the order to access the complete order details and proceed with payment.
Click “Create Order and Send Order Email”, the order will be instantly created and the system will send an order confirmation email to the customer.
If merchant has not input the customer’s email, “Create Order and Send Order Email” Button will not appear.
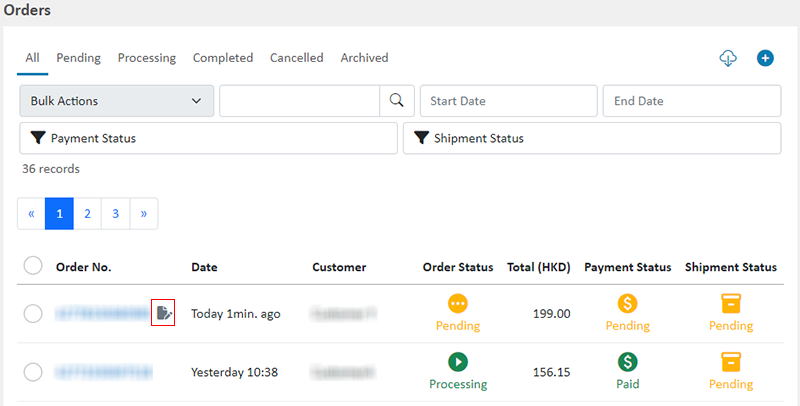
The manual created order will display with an identification icon  next to the order number for easy recognition.
Popular Articles


You May Also Like
SF Express Automated Waybills Printing
Merchants can automatically generate and print SF Express waybills directly through the eshopland system backend. With a single click, merchants can print waybills without requiring to install any a... [read more]
Advanced Footer Design
To enhance the design flexibility for merchants to personalize the shop webpages, eshopland Layout Designer has added advanced footer design elements. Merchants can customize the footer style to mat... [read more]
Initial Shop Setup
When you have registered for your shop account, you can login to the Admin Panel, follow the steps below to begin your initial shop setup.1. Login to Your AccountClick Admin Panel > Settings > Gene... [read more]
Instagram Auto-receive Post Orders
eshopland e-commerce platform has launched the Instagram (IG) Auto-receive Post Orders feature, allowing merchants to effortlessly receive customer orders through Instagram Business Account posts. W... [read more]