Connect Your Domain
You can connect your purchased domain to eshopland platform, so you customers can browse your online shop via your domain. Using a custom domain on your online shop can effectively build trust as well as your brand image.
“Connect Your Domain” feature is applicable to regular customers and is not available for “Trial” version online shops.
If you would like to connect your GoDaddy domain to eshopland, please read Connect your GoDaddy Domain.
1. Adding your domain
Go to Admin Panel > Settings > General,
Enable  Your Domain.
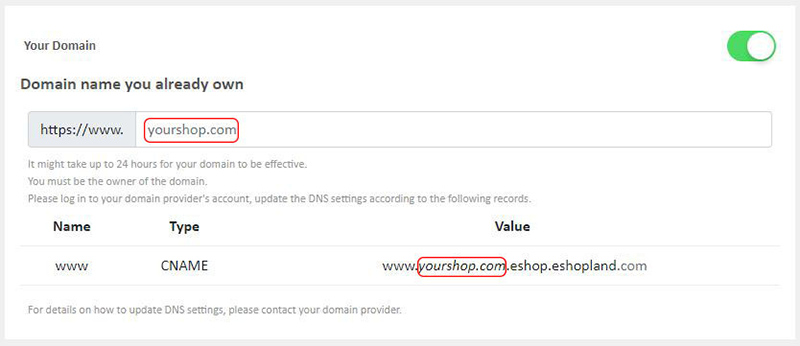
Fill in the domain you have purchased.
Press Save  to complete.
You must be the owner of the domain.
2. Update your DNS records in Your Domain Provider Account
Log in to your domain provider’s account,
go to the DNS settings.
Update the DNS records:
Name www
Type CNAME
Value www.YOURDOMAIN.eshop.eshopland.com
Example:
Assuming your domain is “eshopland.hk”, your online shop URL will be “www.eshopland.hk”. the CNAME configurations is as follows:
Name www
Type CNAME
Value www.eshopland.hk.eshop.eshopland.com
It might take up to 24 hours for your domain to be effective after updating the DNS settings.
When you have successfully added your domain to eshopland, a new TLS/SSL certificate will be automatically created for free.
eshopland cannot access your third-party domain’s settings. If you have any problems when updating your DNS records, please contact your domain provider for assistance.
Popular Articles


You May Also Like
Carousel
When you are working on your webpage design on eshopland, you can add a carousel (slider) module onto your online shop webpage, to attract customers’ attention, get more web traffic and effectively... [read more]
ShipAny Order Shipping Management
Merchants can arrange order shipment by ShipAny logistics automation services on eshopland admin panel to simplify shipping procedures and enhance operational efficiency.To use ShipAny shipping mana... [read more]
Change Order Shipping Method
To cater merchants’ various operational needs, eshopland ecommerce platform system empowers merchants to modify the shipping method the unshipped orders based on actual circumstances when following ... [read more]
Connect to Facebook Page
eshopland ecommerce platform has added the function of auto-receive orders from social media (including Facebook and Instagram). Merchants must have a Facebook Page and Instagram business before usi... [read more]