Media Gallery Overview
Web Design・Design Photos・Product Images
eshopland online shop platform features a multifunctional smart media gallery, allowing merchants to easily store and manage all images for their online shop, including product images, media files for page design and images from the free Pexels stock photo gallery.
1. Enter the Media Gallery
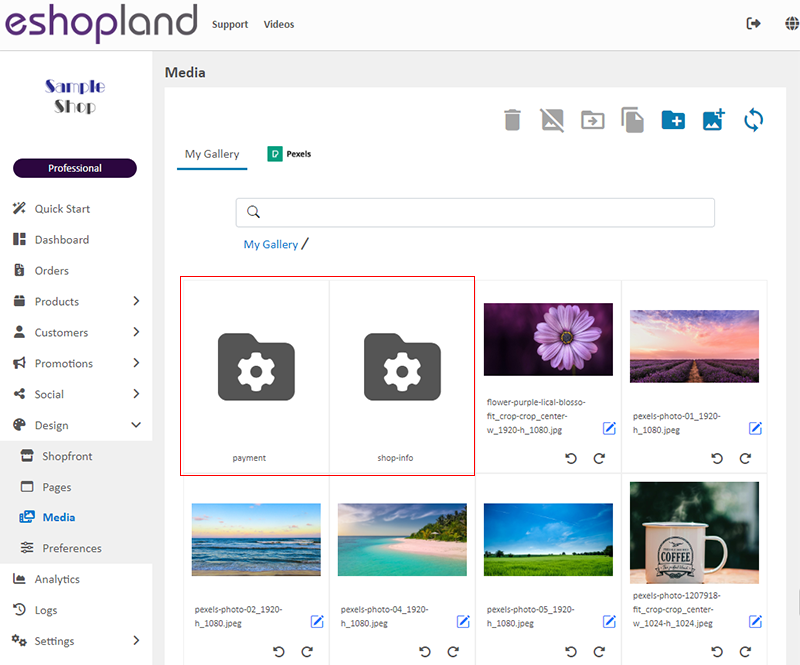
Go to Admin Panel > Design > Media.
All images uploaded by merchants, including product images and design media files, will be automatically stored in the media gallery.
Images which are not added to any folder will be automatically stored in “My Gallery”.
All media files in the gallery will be automatically sorted by image name.
If you anticipate adding a large number of images onto your online shop, it is recommended to add a date label to the image name or place the image in a folder with a date label before applying the image, to facilitate future searching and management of images.
Regularly clearing unused images and media files from the media gallery can prevent slow loading times that may occur when there are too many images in the media gallery.

2. The “shop-info” & “payment” Folders in Media Gallery
The shop logo and favicon images uploaded by merchants when building an eshop will be automatically stored in the system-generated “shop-info” folder.
The payment setting images you upload (such as the AlipayHK QR Code) will be automatically stored in the system-generated “payment” folder.
The “shop-info” and “payment” folders are system-generated and cannot be renamed or deleted.
To avoid affecting the normal display of related images on the online shop webpages, it is recommended not to edit or delete images in the “shop-info” and “payment” folders.
3. Pexels Free Stock Photo
eshopland online shop platform is integrated with the free stock photo gallery website Pexels, allowing merchants to search for Pexel’s free stock images through the media gallery, add them to library and use them as product images or for online shop design.
Pexels is an internationally renowned free stock photo gallery that specializes in providing royalty-free images and videos for personal commercial use.
Click here to learn how to add Pexels free stock images to the “Media Gallery”.

Popular Articles


You May Also Like
Free Shipping on Entire Order
On eshopland ecommerce platform, you can waive free shipping charges for customers. You can also add different terms to the deals and offers to match your business strategy. The system will auto app... [read more]
Manage Membership Points
Merchants can access the backend of the online shop to manually adjust and manage members' points records in accordance with the actual operational conditions.1. Customer RecordGo to Admin Panel > ... [read more]
Account Payment Method
Adding effective payment methods onto your eshopland account to ensure smooth operations of your online shop, without any interruption caused by delay renewal.1. Your Payment Method.Go to Admin Pane... [read more]
Customer Order Records
The authorized shop administrators can view customers’ order records and real-time order status on the customer information page.1. Go to Admin Panel > Customers, select a customer and enter the Cus... [read more]